After getting a lot of positive feedback from my post about how to start a website. I decided to make a post about how to start a blog.
The goal of this website is not to only write about marketing topics I’m interested in, but to help and guide people on starting their own blog.
I’ve broken this guide into 5 simple steps that we will go through one by one. You may need to spend some time thinking about different topics that will be brought up in each step.
However, the 5 steps are very clear and concise that even a nooby can follow.
So without further ado budding bloggers, let’s learn how to blog…
Table of Contents
1. Choose Your Blog’s Niche
If you’re a complete noob, you’re probably wondering what the word niche means. Don’t worry, I was there too. Your blog’s niche is basically the topic your blog is about.
There are many different niches to choose from. Some example niches are pets, traveling, or camping. You can also narrow a niche down even more by creating a blog about not only pets but dogs or cats.
The most important question you will ask yourself before getting into blogging is the niche you choose. There are three very important questions you should ask yourself that will help determine your niche.
- What is my passion?
- What is my expertise?
- Is there an audience?

What is my passion?
Spend a bit of time thinking about what makes you tick. Do you love your pet dog, Buddy? Are you an avid hiker who loves to spend weekends trekking mountains?
These types of questions and ponderings will help you narrow down things you’re passionate about and overall interested in. Make sure to write down your thoughts.
What is my expertise?
The second question is to narrow down what you’re an expert in. Do you have any industry expertise? Are you really good at doing a certain thing that you can share with people?
Having expertise in something means you can provide value that others may not. It also allows you to monetize your blog from the beginning by offering this expertise to people.
Is there an audience?
The final question to ask yourself is, is there an audience for this niche? Because if there is an audience, there’s money to be made.
This question goes without saying because every blog needs visitors to make money. However, not all visitors are created equal. For example, controversial topics such as violence and adult-themed content are not very monetizable.
Interestingly, even websites such as a gaming blog can suffer if your content is about weapons and guns. The main reason being is that advertisers don’t want to be associated with these controversial topics so you will lose premium advertisers from displaying on your website.
According to The Balance Small Business, the most profitable niches are:
- Health and weight loss
- Pets
- Dating and Relationships
- Self improvement
- How to make money online
Overall, this question is to narrow down your audience and to determine whether they are profitable or not.
2. Get a Domain Name and Web Hosting
The next step in this how to start a blog guide is to choose a domain name and web hosting. We will begin with the domain name and some things you should consider:
- Make sure to choose “.com” as your extension.
- Make your domain name brandable. For example, my domain is my name.
- Keep it simple, avoid words or terms that are difficult to spell or pronounce.
- Avoid hyphens or using numbers.
- Consider long term rather than short term. Try keep your domain name broad rather than too specific incase you need to expand your niche in the future.
Once you have decided and confirmed your domain name. The next step is choosing a web hosting service.
For beginners, my number one recommendation is a shared hosting plan with Bluehost.
They offer the best value for as little as $2.95 per month.
To start a blog with Bluehost:
- Visit Bluehost.com and choose “Get Started”.
- Select the Shared Hosting plan.
- Select the Basic Plan.
- Input your domain name.
- Complete the account registration process.
3. Start a Blog By Learning WordPress
WordPress is the best platform to get started with blogging. It’s easy to use and very straightforward. But that doesn’t matter anyway, this guide will walk you through the entire process.
Once you setup your Bluehost account, they provide a one-click installation of WordPress to make it super easy to setup your blog.
When setting up your first website, you will be asked questions such as: do you need help? what kind of site are you making? etc.
Skip all these questions until you get to naming your site and adding a tagline. The prompt should look like the image below:
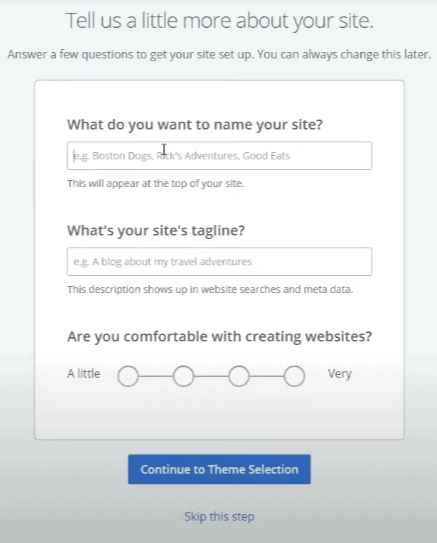
The name of your site is simply what the site is called. The tagline should be the goal of your site.
For example, my site name and tagline is Elliot Kavanagh – Fast track your online business. Simply stating the name and a summary of the site is perfect.
Skip the following steps until you get to the select a theme section. I recommend using Neve theme. It’s a theme I’ve been working with for a while now and all my client’s websites are built using it.
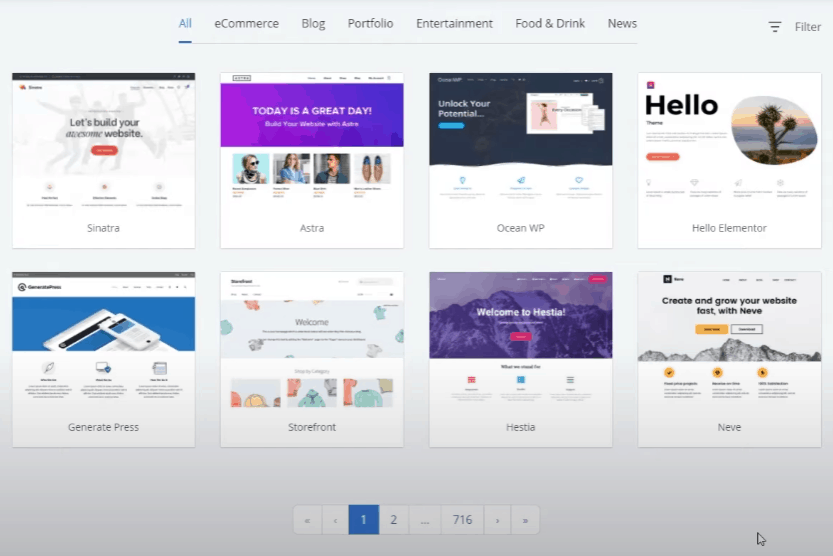
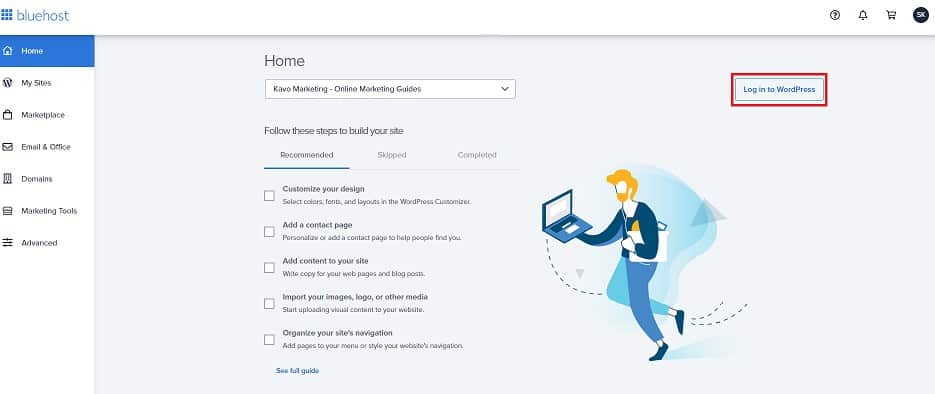
Once you select a theme, you may be given more prompts to purchase extra options. Ignore these prompts until you get to the Bluehost dashboard.
From here, while on the home tab, select Login to WordPress on the right-hand side of the screen.
From here we will…
Learn the WordPress Dashboard
We will go through each function of the dashboard so you have a proper understanding. This is where you will spend most of your time as a blogger so it’s important that you know it.
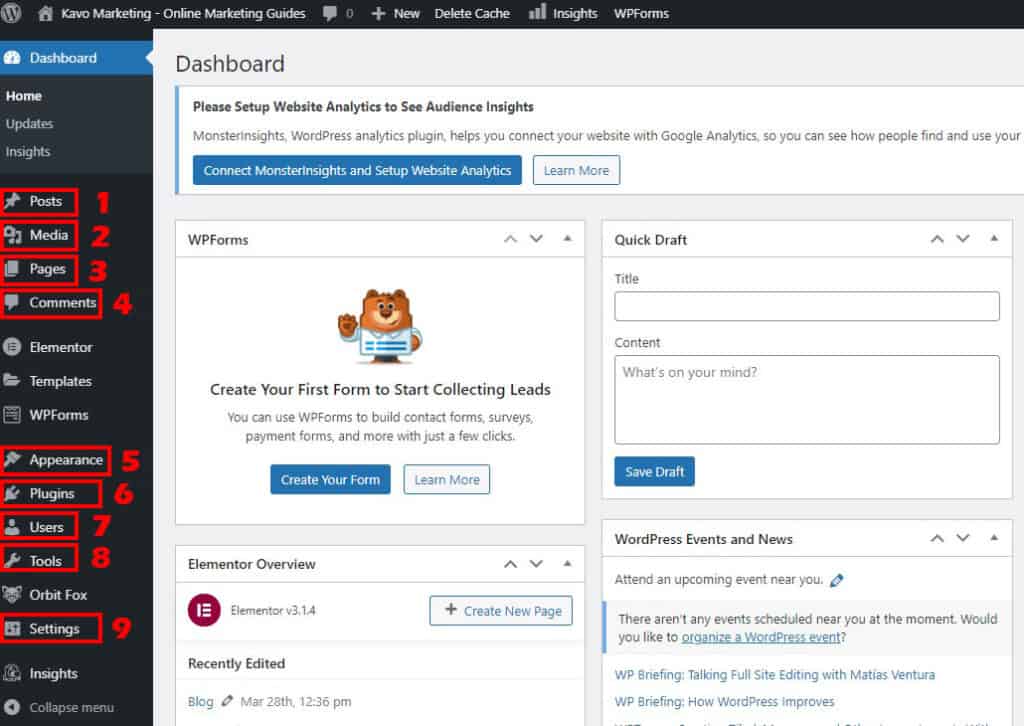
The important WordPress options:
- Posts: In this section you can add new blog posts. This is the section you will use the most as a blogger.
- Media: The media section allows you too upload media files such as photos, documents and video.
- Pages: Pages is where you create pages on your site such as about me, privacy policy and cookie policy.
- Comments: Here you can moderate comments posted on your blog.
- Apperance: The apperance menu allows you to edit how your blog looks such as changing the theme.
- Plugins: Plugins are very important in WordPress and we will show you the essentials ones further into the guide.
- Users: The Users section is where you create new user accounts such as an new author or contributor on your blog.
- Tools: Tools are mainly used for importing and exporting content. However, some plugin options get placed here as you download more.
- Settings: Here you can change and adjust settings for a range of different things on your blog including Search Engine Optimzation.
The options above have a link where you can get a more detailed breakdown of how to use each section.
However, for this guide, we will focus on the most important settings for bloggers.
Create a new username
The username is the name you will use to write blog posts. This is the author’s name that will be displayed for visitors to see who wrote the article.
To set it up, head to Users (section 7) and select add new. Fill in the details and select Add New User to save. Make sure to select the Role of Administrator.

You will then be sent a confirmation email to complete the setup.
If you already see your name and email setup, you can skip this step. Often WordPress auto assigns a default username such as “Admin or Info”. If you see this, you need to complete this step.
Setup Permalinks
This is an important step when setting up your blog. Permalinks are the links that your website creates every time you create a new blog.
The best permalink structure is “Post name”. This appears clean and is easy for search engines to use. To setup permalinks, go to the settings(section 9) and go to Permalinks. Follow the image below and make sure to hit save.
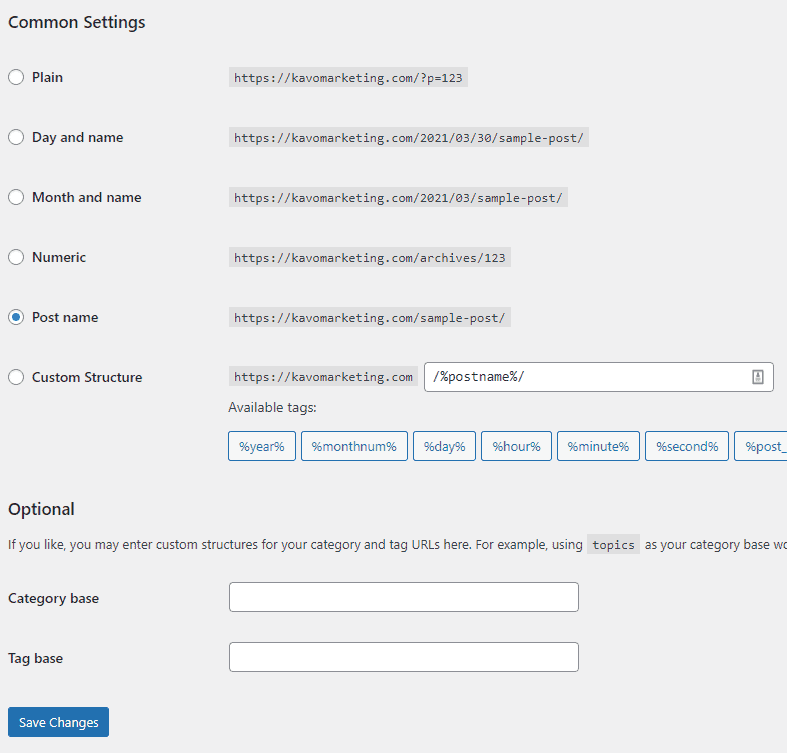
Creating a new user role and setting up permalinks are the two most important parts of starting a blog with WordPress.
I highly recommend exploring more of our free WordPress guides if you want to take your WordPress knowledge to the next level.
Theme Setup – Making your blog beautiful
A theme is how your website will look when people visit it. Different themes have different layouts and designs.
When setting up your Bluehost account you already selected a theme. I recommended Neve theme. This is the theme I will use for the example below. Other theme customization options will be quite similar.
To customize the theme head over to the Appearance menu(section 5). Then select customize. You will then be sent to the menu to customize your theme. See the image below for reference.
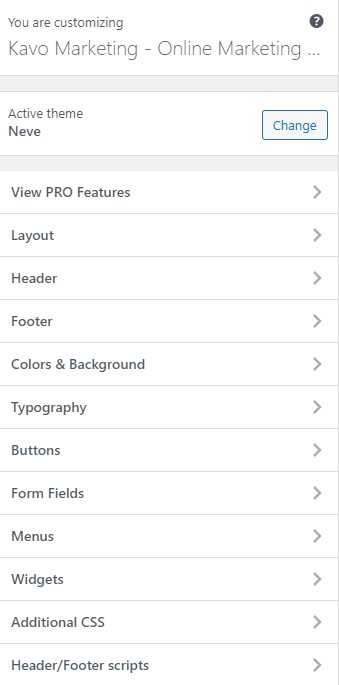
I suggest taking a look around through these options and get used to the feel of it.
The most important settings for beginners are the homepage settings and the header.
To change the homepage settings, go to Layout, then Homepage Settings. From here, choose Home as your homepage and select blog as your blog page. This may be set by default.
Make sure to save changes before exiting the page.
The header option lets you change the layout of your header. This is the section of your site that people see when they first land. So it’s important to have it organized.
Have a look around at the various layouts and setups you can create for your blog.
Setup Your First Pages
The first pages every blogger creates are the About Me, Privacy Policy, Cookie Policy, and the contact page.
We will go through each one together and discuss what should be on each.
About Me
The about me, or about page should tell readers your story. Tell them who you are and where you came from. You can also use this page to tell them about your expertise and experience.
Here are some points that should be included on the about page:
- Your personal story – remember, people want to know about you, not just a faceless brand.
- The goal of the blog – why did you set it up.
- What expertise do you have in your niche.
- Include a nice photo or mug shot of yourself. People connect with other people, not words written on a screen.
Check out my about page as an example of what I mean.
Privacy & Cookie Policy page
The privacy policy and cookie policy are pages setup to inform people about how to use your site. It also informs visitors of any cookie tracking system.
These pages also advise them on how you will use their information or whether you are a part of any affiliate networks.
To setup these pages, check out my guide on how to setup your first page in WordPress.
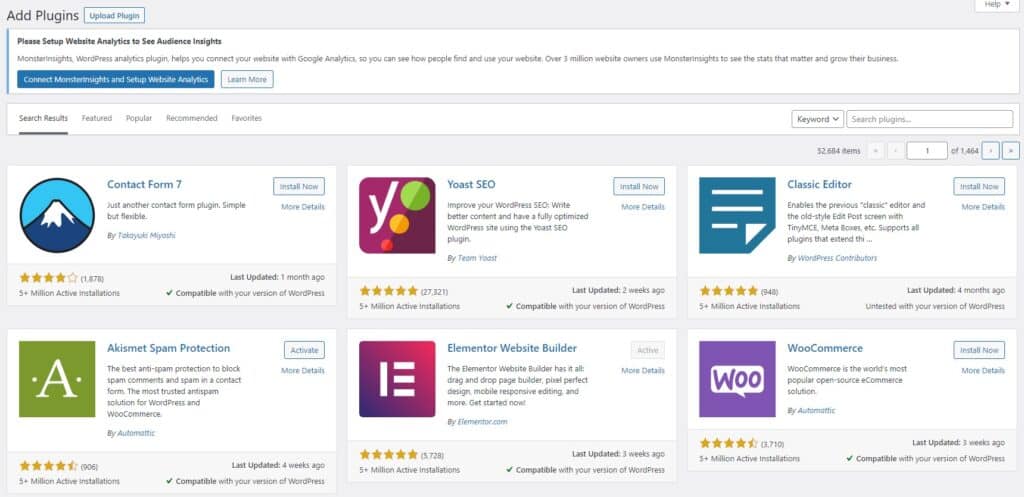
Essential Plugins
I won’t go in-depth on each plugin, if you’re looking for that check out my post on how to add plugins to WordPress.
However, here are the important plugins you should consider installing:
4. Create Quality Content for Your Blog
Blogs used to be websites where people would write about their day and experiences. Not anymore!
Those days are over, now blogs are all about writing quality content that people find valuable. Great content gets love from the Big G(Google).
But how do I write quality content you say? The trick is to write as if you are helping your best friend.
If you were helping your best friend you would tell them everything they need to know and you wouldn’t leave anything out, right?
Well, when you write a guide or review. Make sure it’s the most detailed article you could find on the internet. That is what wins Google’s attention.
There’s also a thing called Search Engine Optimization(SEO). In terms of SEO, there are key aspects you need to get correct when writing an article:
- Choose a keyword or phrase.
- Put this keyword or phrase in the title of the blog post.
- Include the keyphrase in the first paragraph of the text.
- Include the keyphrase in atleast one subheading throughout the text.
- Write a good meta description with the keyphrase included.
For example, this article your reading now targets the keywords, “how to start a blog”. You see it in the title and in the first paragraph. You can also find it in an H2 heading above.
Finally, you may have read the meta description before entering this article. It reads:
This is the ultimate guide on how to start a blog. Let me get straight to the point and help you start a blog in less than 10 minutes!
Practicing these simple key points from the very start of your blog will kickstart your SEO efforts and make sure those articles have the best chance to rank from the get-go.
Additionally, don’t forget to add images, video, and other types of media to keep your readers interested and engaged.
Extra tips when writing blog posts
- Make use of appropriate header taggings such H2 and H3 throughout the artice. This will make it easier for search engines to crawl your content.
- Make sure to keep your writing conversational. This will ensure you connect with your readers.
- Always proof read your content before publishing. Check for errors or any grammatical mistakes. I use Grammarly everyday because its accurate and free.
- Plan out your article beforehand. Use sequence such as beginning, middle and end to structure the content. This will make it so much easier for readers to follow.
- Use a table of contents that visitors can use to quickly jump to the topic they are interested in.
5. Promote Your Blog
Social Media
What good is a blog if you never tell people about it? Social media is a free promo tool and all you need to do is share the link to your article.
The best thing to do is to setup a Twitter account just for your blog.
Anytime you publish a new post share it on your Twitter. Another great tip is to create Twitter cards for your WordPress blog. This is easy to setup and you can have it done in no time using the Yoast plugin.
Social media traffic helps get early visitors to your blog while Google is busy indexing it and deciding where it should rank.
But you shouldn’t stop there…
Guest Posting
Guest posting is the next step in promoting your blog. If you don’t know what it is, guest posting is when you contact another blog and ask them can you publish an article on their blog.
The goal here is to get your name out there and establish authority in your niche. Most blog owners will allow you to link back to your website in the article you publish on their website.
This will, in turn, increase the authority of your blog through the power of backlinking, which I will talk more about in the next section.
However, you don’t want to just guest post on any website. First, you need to establish whether the website is reputable or not. The Domain Authority(DA) is a good indicator of how powerful the domain is.
You can check this using tools such as smallseotools.com domain authority checker. I love this site because it provides a whole range of free services.
How to Start a Blog Summary
There you have it. They are the steps you need to take to start a blog.
5 simple steps:
- Choose your niche
- Get a Domain name and Hosting
- Start a Blog and Learn WordPress
- Create Quality Content
- Promote Your Blog
Your main focus from the start should be the first 4 steps. Step 4 should be taken very seriously. If you don’t create quality content then you’ll never be ranked in Google.
From here on out, you’re fully equipped and ready to take on the world of blogging.
