The website menu is usually the first thing your visitors see when they land on your website so it’s important to know how to setup menus in WordPress. On Desktop, it’s always at the top of the content, and in some cases (on this site) its sticks to the top even when the user scrolls down the page.
On Mobile, it will always be seen first in the form of a hamburger drop-down icon.
There are not only header menus, there are footer menus that are at the bottom of your website. These usually contain policy pages, about, and contact pages.
How you setup your menu is important because it can be used to encourage visitors to explore your website further. Placing buttons and other types of Calls to action will entice visitors not to bounce from your site.
I will take you through everything you need to know when setting up menus in WordPress, everything from the basics to the more advanced features.
Let’s do it…
Table of Contents
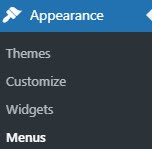
Every first step starts with knowing where the hell you are. So go to your WP dashboard and look for Settings, then select Menus. This will take you to the Menus settings screen.

The Menu Dashboard
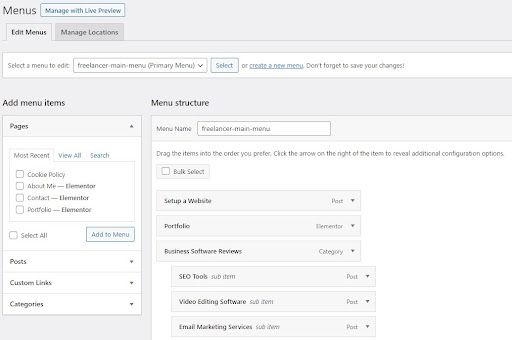
The Menu Settings Dashboard is where you configure how your menu is structured. Check out the image below for reference. Let’s go through each function and explain whats it for:
- Manage with Live Preview: This will take you to your theme customization page where you can edit your menu while looking at a live version of your site.
- Edit Menus: This area lets you fully edit the menu structure. We will take you through that step by step later in the guide.
- Manage Locations: This menu enables you to quickly adjust which menus appear in each location.

How to Edit Menus
There are four sections to editing the menu that you need to learn. They are:
- Select a menu to edit
- Add menu items
- The menu structure
- Menu Settings
Select a menu to edit
Here you select which menu you want to edit. Click on the drop-down menu and select which menu you wish to edit. You also have the option to create a new menu.
Add Menu Items
In this section, you can select which content you want to include in your menu. You can add pages, posts, custom links, and categories. Simply select what you want by ticking the blue box and selecting ‘Add to Menu’.
When you select Add to Menu, the content you added to the menu will appear on the right under Menu Structure. Now let’s learn how to structure our menu.
How to Manage Menu Structure
Once the items are under the Menu Structure. You can use your mouse to drag and drop the items as you wish.
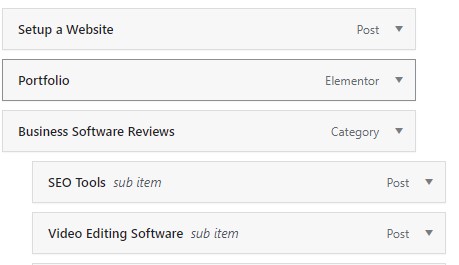
Items to the very left will appear as independent items in the menu.
Items placed under and to the right will appear as drop-down items. See the two images below for reference.
Menu structure from backend

Menu structure from frontend

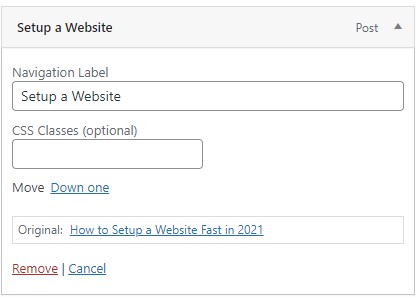
Each one of these menu items can be renamed to whatever you choose. This can be done by clicking on the drop-down arrow on the item.

Using the Navigation Label section, you can change how the item appears on the front end. You can also remove the item from the menu.
Menu Settings
In the Menu Settings at the bottom of the dashboard, you can adjust two options.
The first is whether you want to automatically add new top-level pages to this menu. You will most likely never want this so it’s best to leave it unchecked.
The Display Location controls where you want this menu to show. You have a choice between the main menu and footer menu and more depending on the theme you use.
When you are happy with your menu, make sure to always select Save Menu to see the changes take effect.
Editing from theme customization
There is another way to edit your menu which some themes will have but not all. Navigate to Appearance and then Customize. This will take you to the theme customization panel. This panel is for the Neve theme but it will look similar if you are using a different one.
Here you may see a Menu option. This will allows you to add new menus and items to those menus as you wish. You will also be given a live preview of your site as you make the changes. Check out the image below as an example, you can see that the Menus option is at the bottom of the list.

Adjusting the footer menu on your website follows the exact same process as above. Please refer to step 1. Instead of selecting the header or main menu to change. Select the footer menu. The same adjustments and steps apply but you’ll be changing the menu that appears at the bottom of your website.
Summary
If you’ve got this far, you should now know how to edit and fully setup WordPress menus.
Once you setup one menu, you have learned the skill and can apply it to other sites going forward. It’s the same process every time.
Make sure to check out more free WordPress guides while you’re here.
